This is Part II in a series about making a custom short form video app like Instagram Reels, or YouTube Shorts. If you haven’t read Part I, I suppose that is a prerequisite for this post. In this series we are creating a self-hosted short form video (SFV) media server and client, this specific post assumes that the backend is functional and loaded with media as described in Part I.
The Frontend
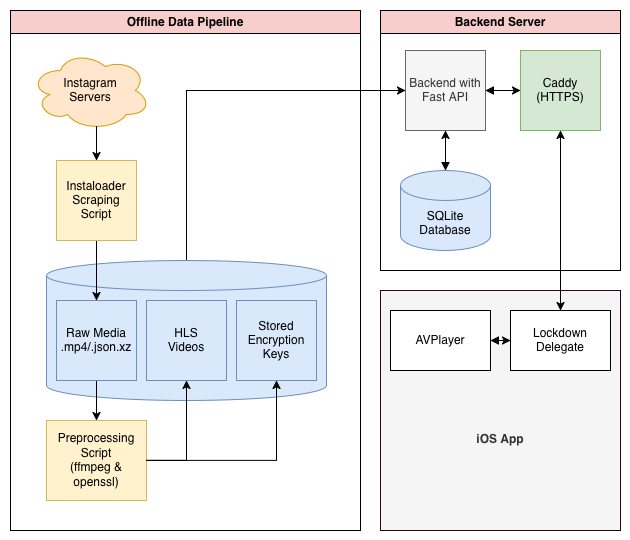
Now the backend is up waiting for anyone to request videos and database information, the next step is to make a client to do exactly that. I chose to go with making an iOS app using Swift, to recreate the authentic Instagram reels feel, and since I already have experience as an iOS developer.
Standard iOS projects use a software architecture called MVVM, which stands for Model, View, ViewModel. These are the three main components which handle the different responsibilities of the app. The Models, serve the same purpose as the Models in our backend. The View is the user interface, and the ViewModel handles all communication between the model and the view model.
The first step, after making a new Xcode project, is to implement in the front end a complete copy of the Video model we have in our backend. I created a new Video.swift file with the following contents to mirror the video object in our database. Since variable naming conventions differ between languages (snake_case in python, and lowerCamelCase in swift) I added a coding keys enum which lets the JSON decoder know which swift variables correspond to which variables the server returns in its response.
import Foundation
struct Video: Codable, Identifiable {

    let id: Int
    let folderName: String
    var isFavorited: Bool
    var rating: Int
    let description: String?
    var tags: [Tag]?
    var flags: [Flag]?
    let shortcode: String?
    let datePosted: String?
    let uploader: String?
    let username: String?
    let dateAdded: String?

    enum CodingKeys: String, CodingKey {
        case id
        case folderName = "folder_name"
        case isFavorited = "is_favorited"
        case rating
        case description
        case tags
        case flags
        case shortcode
        case datePosted = "date_posted"
        case uploader
        case username
        case dateAdded = "date_added"
    }

    // Generates the standard url for the manifest
    func streamURL(base: URL) -> URL? {
        base.appendingPathComponent("videos/\(folderName)/index.m3u8")
    }
}
How the client is going to work is by using the iOS native AVPlayer which natively supports playing HLS videos. However, it has notoriously strict networking constraints, and objects to any additional HTTP headers in the request like our API key. If we were to just give AVPlayer the path to the .m3u8 and .ts files, it would immediately request the files, to which our server wouldn’t respond due to missing the API key. Instead we have to write a custom delegate which intercepts this request, appends the API key, then sends the request off to the server to get the actual video decryption key. To do this, all of our requests are going to use a custom scheme called ‘lockdown,’ but can be anything except from https/http. The handler also replaces the scheme with https before the request is sent.
internal import AVFoundation

class LockdownResourceLoaderDelegate: NSObject, AVAssetResourceLoaderDelegate {
    private let secretKey = APIConfig.secretKey
    func resourceLoader(_ resourceLoader: AVAssetResourceLoader, shouldWaitForLoadingOfRequestedResource loadingRequest: AVAssetResourceLoadingRequest) -> Bool {
        guard let url = loadingRequest.request.url, url.scheme == "lockdown" else {
            return false // Let AVPlayer handle it if it's not our custom scheme
        }

        let baseURL = APIConfig.webBaseURL

        // Reconstruct the URL using the correct scheme, host, and port, but keep the path
        var components = URLComponents(url: url, resolvingAgainstBaseURL: false)
        components?.scheme = baseURL.scheme
        components?.host = baseURL.host
        components?.port = baseURL.port

        guard let finalURL = components?.url else { return false }

        // Build the request with the API Key
        var request = URLRequest(url: finalURL)
        request.setValue(secretKey, forHTTPHeaderField: "api-key")

        let task = URLSession.shared.dataTask(with: request) { data, response, error in

            if let data = data, error == nil {

                loadingRequest.dataRequest?.respond(with: data)
                loadingRequest.finishLoading()

            } else {
                loadingRequest.finishLoading(with: error ?? URLError(.badServerResponse))

            }
        }

        task.resume()
        return true
    }
}
One more thing is to securely add the API key to the front end. If you merely paste the string in, it could accidentally be pushed to your git repo (bad). Instead, I added the key in a Secrets.xcconfig and listed that file in my .gitignore. Then I wrote the following helper enum to hold both key network constants: the API key, and the BaseURL:
enum APIConfig {
    static let webBaseURL = URL(string: "<Your Domain>")!

    static var secretKey: String {
        guard let key = Bundle.main.object(forInfoDictionaryKey: "API_KEY") as? String else {
            fatalError("API_SECRET_KEY is missing from Info.plist or Secrets.xcconfig")
        }
        return key
    }
}
With this out of the way we can write our two ViewModels: NetworkManager and VideoFeedManager. Let’s start with the VideoFeedManager. This ViewModel will control what videos are being shown to the user, requesting new ones when the feed gets low. To create the instant infinite scroll effect, we will actually use three different video players that will get recycled as the user scrolls, this way we can load videos in advance, and save the last one in case the user quickly scrolls back.
import Foundation
import AVKit
import Observation

@Observable
class VideoFeedManager {
    // 3-Player Pool
    var players: [AVQueuePlayer] = [AVQueuePlayer(), AVQueuePlayer(), AVQueuePlayer()]
    private var loopers: [AVPlayerLooper?] = [nil, nil, nil]
    var items: [URL] = []

    // Create a delegate instance
    private let resourceLoaderDelegate = LockdownResourceLoaderDelegate()

    func setup(with urls: [URL]) {
        self.items = urls
        updatePool(for: 0)
    }

	// Pause every player in the pool
    func pauseAll() {
        players.forEach { $0.pause() }
    }

    func updatePool(for currentIndex: Int) {

        guard !items.isEmpty, items.indices.contains(currentIndex) else { return }

        let currentPlayerIndex = currentIndex % 3
        // Prepare current, next, and previous players
        preparePlayer(at: currentIndex, poolIndex: currentPlayerIndex)

        // Play the newly prepared or existing player
        players[currentPlayerIndex].play()

        if currentIndex + 1 < items.count {
            preparePlayer(at: currentIndex + 1, poolIndex: (currentIndex + 1) % 3)
        }

        if currentIndex - 1 >= 0 {
            preparePlayer(at: currentIndex - 1, poolIndex: (currentIndex - 1) % 3)
        }
    }

    private func preparePlayer(at itemIndex: Int, poolIndex: Int) {
        guard items.indices.contains(itemIndex) else { return }
        let url = items[itemIndex]

        // Build the asset and attach our security delegate
        let asset = AVURLAsset(url: url)
        asset.resourceLoader.setDelegate(resourceLoaderDelegate, queue: DispatchQueue.global(qos: .userInitiated))

        let item = AVPlayerItem(asset: asset)
        let player = players[poolIndex]

        // Skip rebuilding the looper if the URL is already loaded in this player
        if let currentAsset = player.currentItem?.asset as? AVURLAsset, currentAsset.url == url {
            return
        }

        loopers[poolIndex]?.disableLooping()
        let newPlayer = AVQueuePlayer()
        players[poolIndex] = newPlayer
        loopers[poolIndex] = AVPlayerLooper(player: newPlayer, templateItem: item)

    }

    func append(urls: [URL]) {
            self.items.append(contentsOf: urls)

    }
}
Now we can create our second ViewModel, the NetworkManager. This will facilitate most contact with the backend (aside from the HLS requests which are automatically handled by our lockdown delegate and iOS’s AVPlayer). The NetworkManager also stores all currently loaded video references which are passed to our new VideoFeedManager.
import Foundation
import Observation

@Observable
class NetworkManager {
    var videos: [Video] = []
    private var isFetchingMore = false

    @ObservationIgnored
    private let manager: VideoFeedManager

    let resourceLoaderDelegate = LockdownResourceLoaderDelegate()

    init(manager: VideoFeedManager) {
        self.manager = manager
    }

    // Could be http://localhost:3001 or wherever you are hosting the api.
    var baseURL = URL(string: "<YOUR DOMAIN>")!

    private func authenticatedRequest(for url: URL, method: String = "GET") -> URLRequest {
        var request = URLRequest(url: url)
        request.httpMethod = method
        request.setValue(APIConfig.secretKey, forHTTPHeaderField: "api-key")
        request.setValue("application/json", forHTTPHeaderField: "Content-Type")
        return request
    }

    private func mutateVideo(folderName: String, mutate: (inout Video) -> Void) {
        if let i = videos.firstIndex(where: { $0.folderName == folderName }) {
            mutate(&videos[i])
        }
    }

    func fetchFeed() async {
        do {
            let request = try buildFeedRequest()
            let (data, _) = try await URLSession.shared.data(for: request)
            let decodedVideos = try JSONDecoder().decode([Video].self, from: data)

            self.videos = decodedVideos
            let urls = decodedVideos.compactMap { $0.streamURL(base: self.baseURL) }

            manager.setup(with: urls)
        } catch {
            print("Feed fetch failed: \(error)")
        }
    }


    func fetchMoreFeed() async -> [Video] {
        guard !isFetchingMore else { return [] }
        isFetchingMore = true
        defer { isFetchingMore = false }

        do {
            let request = try buildFeedRequest()
            let (data, _) = try await URLSession.shared.data(for: request)
            let decodedVideos = try JSONDecoder().decode([Video].self, from: data)

            let existingIds = Set(self.videos.map { $0.id })
            let newVideos = decodedVideos.filter { !existingIds.contains($0.id) }


            self.videos.append(contentsOf: newVideos)
            let newUrls = newVideos.compactMap { $0.streamURL(base: self.baseURL) }
            manager.append(urls: newUrls)

            return newVideos
        } catch {
            print("Failed to fetch more feed: \(error)")
            return []
        }
    }

    private func buildFeedRequest() throws -> URLRequest {
        let url = baseURL.appendingPathComponent("api/feed/random")
        return authenticatedRequest(for: url)
    }
}
That covers creating and maintaining our apps video feed. Now we need to add two local functions for setting the request to favorite/unfavorite a video, and update the rating for a video.
    func toggleFavorite(for folderName: String) async {
        let currentState = videos.first(where: { $0.folderName == folderName })?.isFavorited ?? false
        let desiredState = !currentState

        mutateVideo(folderName: folderName) { $0.isFavorited = desiredState }

        let url = baseURL.appendingPathComponent("api/videos/\(folderName)/favorite")
        var request = authenticatedRequest(for: url, method: "POST")

        do {
            request.httpBody = try JSONSerialization.data(withJSONObject: ["is_favorited": desiredState])
            let (_, response) = try await URLSession.shared.data(for: request)

            if let http = response as? HTTPURLResponse, http.statusCode != 200 {
                mutateVideo(folderName: folderName) { $0.isFavorited = currentState }
            }
        } catch {
            mutateVideo(folderName: folderName) { $0.isFavorited = currentState }
        }
    }

    func updateRating(for folderName: String, rating: Int) async {
        let currentRating = videos.first(where: { $0.folderName == folderName })?.rating ?? 0

        mutateVideo(folderName: folderName) { $0.rating = rating }
        let url = baseURL.appendingPathComponent("api/videos/\(folderName)/rating")
        var request = authenticatedRequest(for: url, method: "POST")

        do {
            request.httpBody = try JSONSerialization.data(withJSONObject: ["rating": rating])
            let (_, response) = try await URLSession.shared.data(for: request)

            if let http = response as? HTTPURLResponse, http.statusCode != 200 {
                mutateVideo(folderName: folderName) { $0.rating = currentRating }
            }
        } catch {
            mutateVideo(folderName: folderName) { $0.rating = currentRating }
        }
    }
The User Interface
Finally, we have made it to the point where we can make the app fully functional by implementing the user interface. When you created the Xcode project, it automatically creates a ContentView file with SwiftUI imported. This file is where the UI is set up. If you are unfamiliar with SwiftUI, I highly recommend Paul Hegary’s CS193p course on YouTube.
In this view we initialize both of our ViewModels. For the infinite scroll effect, we will put all three of our players inside of a ScrollView with .scrollTargetBehavior(.paging), to ensure it is always centered on a video. In order to overwrite the default video player UI which has annoying buttons, we need to create a custom video player class as well.
import SwiftUI
internal import AVFoundation
import AVKit

struct ContentView: View {
    @State private var manager: VideoFeedManager
    @State private var networkManager: NetworkManager
    @State private var activeIndex: Int?

    init() {
        let playerManager = VideoFeedManager()
        self._manager = State(initialValue: playerManager)
        self._networkManager = State(initialValue: NetworkManager(manager: playerManager))
    }

    var body: some View {
		if networkManager.videos.isEmpty {
			// Message for when no videos are found.
			VStack(spacing: 16) {
				Image(systemName: "film.slash.fill")
					.font(.system(size: 56))
					.foregroundStyle(.white.opacity(0.4), .white.opacity(0.1))
					.symbolRenderingMode(.hierarchical)

				Text("No Videos Found")
					.font(.title3.weight(.bold))
					.foregroundColor(.white.opacity(0.9))
			}
		} else {
			ScrollView(.vertical, showsIndicators: false) {
				LazyVStack(spacing: 0) {
					ForEach(Array(manager.items.enumerated()), id: \.offset) { index, _ in
						let isInPool = activeIndex != nil && abs(index - (activeIndex ?? 0)) <= 1
						let player = isInPool ? manager.players[index % 3] : nil

						ZStack {
							if let player = player {
								CustomVideoPlayer(player: player)
									.background(Color.black)
									.onTapGesture {
										if player.timeControlStatus == .playing {
											player.pause()
										} else {
											player.play()
										}
									}

								if index < networkManager.videos.count {
									let video = networkManager.videos[index]
									ReelsOverlay(video: video, networkManager: networkManager, player: player)
								}
							}
						}
						.containerRelativeFrame([.horizontal, .vertical])
						.clipped()
						.id(index)
						.onAppear {
							if index == manager.items.count - 3 {
								Task { await networkManager.fetchMoreFeed() }
							}
						}
					}
				}
				.scrollTargetLayout()
			}
			.scrollTargetBehavior(.paging)
			.clipped()
			.scrollPosition(id: $activeIndex)
			.onChange(of: activeIndex) { _, newIndex in
				if let newIndex {
					manager.updatePool(for: newIndex)
				}

            }
        }
        .frame(maxWidth: .infinity, maxHeight: .infinity)
        .background(Color.black)
        .task {
            if manager.items.isEmpty { await networkManager.fetchFeed() }
        }
    }
}

class PlayerUIView: UIView {
    override class var layerClass: AnyClass { AVPlayerLayer.self }
    var playerLayer: AVPlayerLayer { layer as! AVPlayerLayer }
}

struct CustomVideoPlayer: UIViewRepresentable {
    var player: AVPlayer

    func makeUIView(context: Context) -> PlayerUIView {
        let view = PlayerUIView()
        view.playerLayer.player = player
        view.playerLayer.videoGravity = .resizeAspectFill
        return view
    }

    func updateUIView(_ uiView: PlayerUIView, context: Context) {
        uiView.playerLayer.player = player
    }
}
If you launch the app now it finally is a working prototype! You should be able to swipe endlessly and view all your reels. This is exciting, however its looking a little bland, what about all that metadata we pulled from the jsons, and the API hooks for rating/favoriting videos? We can incorporate those video-specific features by adding an overlay to each player, which includes buttons for liking and displays the metadata.
import SwiftUI
internal import AVFoundation

struct ReelsOverlay: View {
    var video: Video
    var networkManager: NetworkManager
    let player: AVPlayer

    @State private var isExpanded = false

    var body: some View {
        ZStack(alignment: .topLeading) {

            // --- Info Box ---
            if isExpanded {
                VStack(alignment: .leading, spacing: 8) {
                    metadataRow(label: "FOLDER", value: video.folderName)
                    metadataRow(label: "SHORTCODE", value: video.shortcode ?? "NULL")
                    metadataRow(label: "POSTED", value: video.datePosted ?? "NULL")
                    metadataRow(label: "UPLOADER", value: video.uploader ?? "NULL")
                    metadataRow(label: "USERNAME", value: video.username ?? "NULL")
                    metadataRow(label: "ADDED", value: video.dateAdded ?? "NULL")
                }
                .padding(16)
                .background(Color.black.opacity(0.8))
                .cornerRadius(12)
                .padding(.top, 64)
                .padding(.leading, 16)
                .transition(.opacity)
                .zIndex(10)
            }

            // --- Main Bottom UI ---
            VStack(spacing: 0) {
                Spacer()

                HStack(alignment: .bottom, spacing: 16) {
                    // Bottom Left: Username and Expandable Description
                    VStack(alignment: .leading, spacing: 8) {
                        if let username = video.username {
                            Text("@\(username)")
                                .font(.system(size: 16, weight: .bold))
                                .foregroundColor(.white)
                                .shadow(radius: 4)
                        }

                        Text(video.description ?? "No description available")
                            .font(.system(size: 14, weight: .medium))
                            .foregroundColor(.white)
                            .lineLimit(isExpanded ? nil : 2)
                            .multilineTextAlignment(.leading)
                            .shadow(radius: 4)
                            .onTapGesture {
                                withAnimation(.spring()) { isExpanded.toggle() }
                            }
                    }

                    Spacer()

                    // Bottom Right: Actions
                    VStack(spacing: 18) {
                        Button(action: {
                            Task { await networkManager.toggleFavorite(for: video.folderName) }
                        }) {
                            Image(systemName: video.isFavorited ? "heart.fill" : "heart")
                                .font(.system(size: 20, weight: .bold))
                                .foregroundStyle(video.isFavorited ? .pink : .white)
                                .frame(width: 52, height: 52)
                                .background(Color.black.opacity(0.6))
                                .clipShape(Circle())
                        }
                    }
                }
                .padding(.horizontal, 20)
                .padding(.bottom, 12)
            }
        }
    }

    // A small view builder to neatly display each video column.
    private func metadataRow(label: String, value: String) -> some View {
        HStack(alignment: .top) {
            Text("\(label):")
                .font(.system(size: 10, weight: .bold))
                .foregroundColor(.white.opacity(0.5))
                .frame(width: 75, alignment: .leading)
            Text(value)
                .font(.system(size: 10, weight: .bold))
                .foregroundColor(.white)
        }
    }
}
A Full Stack Project
At this point, we have finished a complete full stack project. You can find plenty of tutorials online about how to install your app onto your device using TestFlight, and if you have the server set up for remote access, you can now access your reels from anywhere!
Working on this project was a fun reminder of why I enjoy the full-stack approach. It was satisfying to bridge the gap between the backend and the SwiftUI frontend, and I specifically enjoyed the challenge of setting up my own backend again and getting a proper database running as it’s been a while since I’ve done either from scratch.
Of course, this is a personal project, not a commercial product. If I were looking at scaling this for actual users, the current setup of local file mounting and a simple SQLite database would hit a wall pretty quickly. To make it production-ready, you’d want to move toward S3-compatible storage, a proper Content Delivery Network like Cloudfront, and aggressive caching layers for the video players.
It’s easy to forget that while corporations invest billions into these massive apps that we have zero control over, it isn’t actually that difficult to recreate a similar experience for yourself. If you want more control over what you’re consuming, building your own tools is a great way to get it.
If you want, you can stop here, and continue to work on the project with your own additions. In Part III of this series, I’ll dive into some extensions I’ve been working on to make the app even more functional. I’ll discuss adding a tagging system, adding image post support, and a way to filter the feed so you can see exactly what you’re looking for.